
Oh, where do I even begin with my love for Eyeball Brownies? The first time I dreamt up this spooky delight was quite by accident during a cozy Halloween gathering with friends. It was a chilly evening, the kind where the warmth of the oven wraps you up like a fuzzy blanket. As the deliciously oozy scent of brownies wafted through my kitchen, I couldn’t help but let my imagination run wild. With the help of some green candy melts and those cheeky little candy eyeballs, what started as a simple brownie recipe morphed into a whimsical treat that had everyone gasping and laughing at the sight.
Table of Contents
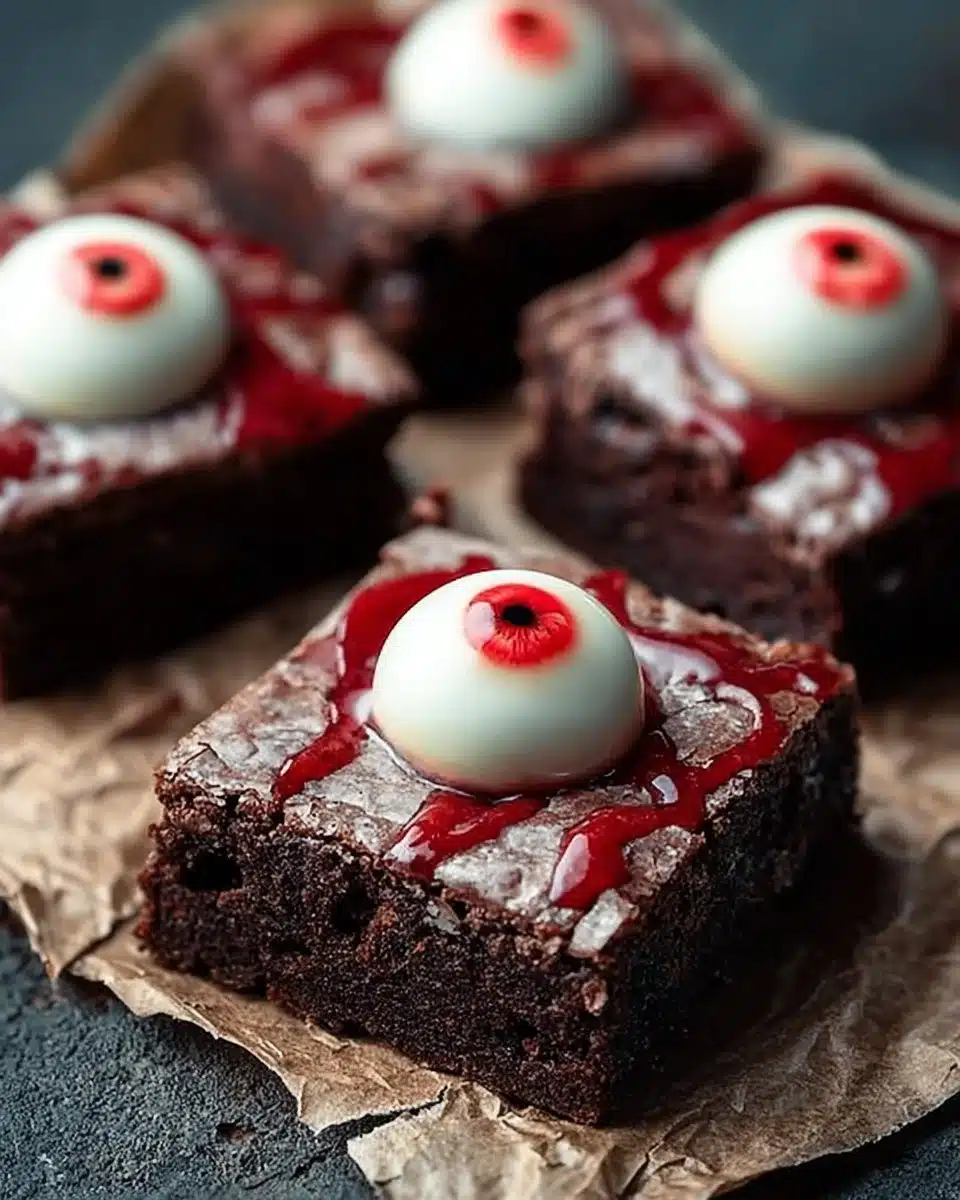
The moment you bite into one of these decadent squares, you’re met with the rich, chocolatey flavor we all adore—think of the soft, chewy texture that just melts in your mouth, paired with the fun pop of the candy eyeballs! It’s a burst of nostalgia set against the delightful and ghoulish backdrop of Halloween. This treat is loved not just for its deliciousness but also for its ability to bring joy and laughter to gatherings, making it a showstopper that everyone will want to recreate. You, too, will adore these Eyeball Brownies and create sweet memories in your cozy kitchen!
Why You’ll Love This Recipe
- Easy to Make: With just a few simple steps, these creepy cuties come together in no time!
- Quick Preparation: Perfect for last-minute Halloween treats or an enchanting party dish.
- Family Fun: Get your little ghouls involved in the decorating process. It’s all about teamwork!
- Crowd-Pleasing: Every bite is sure to elicit smiles and laughter, making them a hit at any gathering.
- Flexible Ingredients: Perfect for customizing with whatever spooky decorations you have on hand.
Ingredients
- 1 box of brownie mix: Quick and convenient, saving you time so you can focus on the fun decorations!
- 1/4 cup of water: Just the right amount to keep those brownies moist and fudgy.
- 1/2 cup of vegetable oil: This enriches the texture and makes them delightfully gooey.
- 2 large eggs: Essential for binding everything together and adding that fluffy texture.
- Green candy melts: The star of the show! Melted and dipped for that creepy eye effect.
- Red gel icing: To create those spooky bloodshot veins—just a dash makes a big difference!
- Candy eyeballs: These tiny treats bring tons of charm and whimsy to your brownies.
Full recipe card is below.
How to Make It
1. Preheat the Oven
Preheat your oven to 350°F (175°C). Grease your favorite baking pan generously. The aroma of rich chocolate brownie fills the air as it bakes—oh, the anticipation is half the fun!
2. Mixing Brownie Batter
In a mixing bowl, whisk together the brownie mix, water, vegetable oil, and eggs until smooth. You’ll notice how luscious the batter looks, the glossy sheen hinting at the pockets of fudginess to come. Just try not to sneak too many tastes—it’s tough, I know!
3. Bake the Brownies
Pour your brownie batter into the prepared baking pan, spreading it evenly. Bake according to the package instructions and let those delectable scents engulf your kitchen. This may just be the best part!
4. Cool and Cut
Once baked, let the brownies cool completely. This is when you can imagine the playful delight of your guests as they see what’s to come! Cut them into squares as you admire your chocolate masterpiece.
5. Melt the Candy
Melt the green candy melts according to the package instructions. The vibrant color is simply enchanting, making it feel like Halloween magic is in the air!
6. Dip the Brownies
Dip the tops of the brownie squares into the melted green candy, creating your ‘eyeballs’. Shake off any excess so that they look neat and tidy.
7. Add the Veins
Use red gel icing to add ‘bloodshot’ veins around each candy eyeball. The little details make all the difference and will get everyone giggling!
8. Final Touch
Place a candy eyeball in the center of each green ‘eyeball’ brownie and serve. Watch their eyes light up when they spot these spooky treats!
Pro Tips for Success
- Use a Liners: For easier removal, line your baking pan with parchment paper before greasing.
- Chill the Brownies: For cleaner lines when cutting, refrigerate for about 30 minutes after they have cooled slightly.
- Get Creative: Don’t hesitate to sprinkle some edible glitter or crushed candy corn for extra festive flair!
- Double the Fun: Make two batches—one with green and one with your favorite colors!
Flavor Variations
- Nutty Surprise: Add some chopped nuts to the brownie batter for a delightful crunch.
- Pumpkin Spice: Incorporate a few teaspoons of pumpkin spice into the mix for a seasonal twist.
- Swirl it Up: Swirl in some peanut butter or caramel sauce for an added layer of decadence!
Serving Suggestions
These Eyeball Brownies are perfect on their own, but pair them with a scoop of vanilla ice cream for a delightful contrast! For drinks, a cozy pumpkin spice latte or a warm cup of cider complements these spooky treats beautifully.
Make-Ahead & Storage
You can prepare the brownies a day in advance—just keep them tightly wrapped in plastic wrap! Once decorated, store them in an airtight container at room temperature for about 3-5 days.
Leftovers
If you have any leftovers (which is rare!), crumble the brownies into a parfait with whipped cream and more candy eyeballs. An instant spooky dessert upgrade!
Freezing
Yes, these brownies can be frozen! Just wrap them individually in plastic wrap and then in aluminum foil. They will stay fresh for up to three months. Thaw overnight in the refrigerator before serving.
Reheating
For the best texture, reheat brownies in the oven at 350°F (175°C) for about 5-10 minutes. You can also warm them up briefly in the microwave for that freshly-baked feel—just remember to keep an eye on them!
FAQs
Can I use homemade brownie batter?
Absolutely! Just follow the same dipping and decorating process for homemade brownies.
How can I make these gluten-free?
Simply use a gluten-free brownie mix or a homemade gluten-free recipe that you adore!
Do I have to use candy eyeballs?
Not at all! You could swap them for chocolate chips or even gumballs if you want to mix it up.
How can I make the icing veins thinner?
Use a toothpick to gently draw the veins, which will help control the thickness and achieve that perfect spooky look!
Final Thoughts
Cooking, dear friends, is so much more than just preparing food; it’s about creating memories and magical moments in your kitchen. I hope you find joy and laughter in making these Eyeball Brownies as much as I do. Gather your loved ones, sip on a warm drink, and bring a sprinkle of spooky fun to your next gathering! Happy baking, and may your Halloween be filled with delicious treats and laughter! 🖤✨
Eyeball Brownies
Ingredients
Brownie Base
- 1 box brownie mix Quick and convenient, saving you time so you can focus on the fun decorations!
- 1/4 cup water Just the right amount to keep those brownies moist and fudgy.
- 1/2 cup vegetable oil This enriches the texture and makes them delightfully gooey.
- 2 large eggs Essential for binding everything together and adding that fluffy texture.
Decorations
- 1 cup green candy melts The star of the show! Melted and dipped for that creepy eye effect.
- 1 tub red gel icing To create those spooky bloodshot veins—just a dash makes a big difference!
- 1 cup candy eyeballs These tiny treats bring tons of charm and whimsy to your brownies.
Instructions
Preparation
- Preheat your oven to 350°F (175°C). Grease your favorite baking pan generously.
- In a mixing bowl, whisk together the brownie mix, water, vegetable oil, and eggs until smooth.
Baking
- Pour your brownie batter into the prepared baking pan, spreading it evenly.
- Bake according to the package instructions and let the brownies cool completely afterward.
Decoration
- Melt the green candy melts according to the package instructions.
- Dip the tops of the brownie squares into the melted green candy, creating your ‘eyeballs’.
- Use red gel icing to add ‘bloodshot’ veins around each candy eyeball.
- Place a candy eyeball in the center of each green ‘eyeball’ brownie and serve.