
There’s something absolutely delightful about seasonal treats that whisk us away to the warm embrace of childhood. I’ll never forget the first time I made Pumpkin Patch Dirt Cups in my little kitchen during fall. The aroma of chocolate wafted through the air as I crushed the Oreos, my hands dusted with crumbles, and the sun filtered softly through the kitchen window. The laughter of my little ones echoed around me as they eagerly anticipated the sweet, gooey goodness we were about to create.
Table of Contents
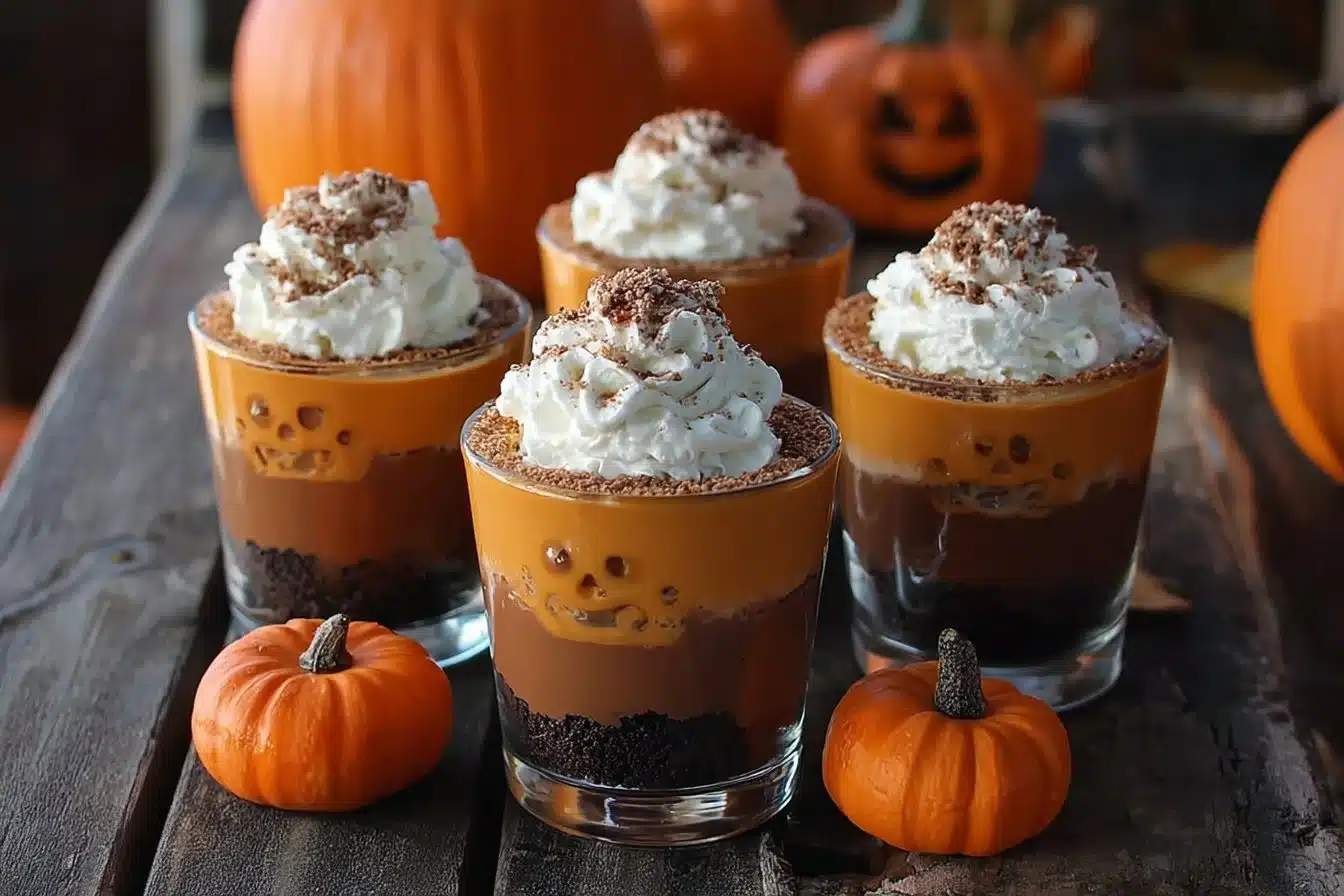
These charming little cups are a playful nod to the beloved autumn tradition of visiting pumpkin patches. They bring the sweetness of creamy chocolate pudding together with the crunch of Oreos and the whimsical touch of candy pumpkins and gummy worms. It’s a recipe that not only delights the taste buds but also creates warm memories around the table. Bring your loved ones into the kitchen, and together let’s create not just a dessert but a moment of joy. I promise these Pumpkin Patch Dirt Cups will become a beloved favorite in your home!
Why You’ll Love This Recipe
- Quick & Easy: You can whip these up in just 30 minutes—perfect for busy weeknights or last-minute gatherings.
- Crowd-Pleasing: With a fun, layered presentation and playful toppings, these cups are sure to bring smiles to both kids and adults alike!
- No-Bake Delight: No oven needed! Just mix, layer, and chill for a delightful treat that’s effortlessly fantastic.
- Customizable: This recipe lets you get creative! Feel free to swap in your favorite treats or seasonal candies.
- Satisfying Texture: The layer of creamy pudding, crunchy Oreos, and fluffy whipped cream creates a mouthwatering experience.
Ingredients
- 1 package chocolate pudding: This rich pudding is the star! Make sure to use high-quality chocolate for an extra indulgent flavor.
- 1 package crushed Oreos: Crushed up, they add that delightful crunch and a hint of nostalgia. Feel free to use any chocolate sandwich cookie!
- 1 cup whipped cream: For a fluffy, light texture, homemade whipped cream is a dream, but store-bought works just as well—your choice!
- Gummy worms: These playful additions bring whimsy to your dirt cups; you can’t have a pumpkin patch without a few friendly critters!
- Candy pumpkins: Sweet and festive, these little treats not only look adorable but also complement the chocolatey goodness beautifully.
- Plastic cups: Using see-through cups allows everyone to admire the beautiful layers you create! Plus, they’re easy for kids to handle.
Full recipe card is below.
How to Make It
1. Prepare the Chocolate Pudding
Begin by preparing the chocolate pudding according to package instructions. As you mix the cold milk with the pudding mix, watch it transform into a rich, glossy mixture. The smell? Oh, heavenly chocolate goodness!
2. Layer Your Ingredients
In each plastic cup, start layering with a generous dollop of chocolate pudding at the bottom. Feel free to get creative with your portions – a little more pudding never hurt anyone!
3. Add Crushed Oreos
Next, sprinkle a layer of crushed Oreos on top of the pudding. Hear that slight crunch? That’s the sound of magic in the making!
4. Fluffy Topping
Follow up with a fluffy layer of whipped cream—oh, the clouds of sweetness! Repeat these layers until your cups are filled to the brim, ensuring a final layer of crunchy Oreos on top.
5. Decorate with Gummy Worms & Candy Pumpkins
Now, it’s time for the fun part! Top each cup with gummy worms peeking out of the “dirt” and add a few candy pumpkins for that cozy autumn touch. It’s like creating your own adorable edible garden!
6. Chill and Serve
Place the cups in the refrigerator for at least 30 minutes to chill. The flavors will meld beautifully, making each bite a delicious adventure!
Pro Tips for Success
- Chill the Pudding: For a creamier texture, allow the pudding to chill longer before assembling.
- Layering Technique: Keep your layers even for a beautiful presentation—use a spoon or a piping bag for neat layers.
- Make it Personal: Let your kiddos help with the layering and decorating for a fun family activity!
- Taste as You Go: This is a great opportunity to do a little taste testing—make sure everything is as delicious as you want it!
Flavor Variations
- Use Vanilla Pudding: Swap chocolate for vanilla pudding and add a sprinkle of pumpkin spice for a seasonal twist!
- Try Different Cookies: Crushed chocolate wafers or even graham crackers would give you a different, yet delicious twist.
- Seasonal Fruits: Toss in some seasonal fruits like bananas or berries for a fresh, tart contrast!
Serving Suggestions
These dirt cups are fabulous on their own, but pair them with some spiced apple cider or a cozy cup of hot chocolate for an ultimate fall treat. For plating, just leave them in the cute plastic cups and adorn with a sprinkle of cinnamon on top!
Make-Ahead & Storage
You can make these delicious cups one day in advance. Just store them in the refrigerator covered, and they’ll stay fresh! They’re best enjoyed within two days of assembly, so keep that in mind if you’re planning for a gathering.
Leftovers
If you have some pudding left over, why not create a chocolate parfait with some yogurt and fresh fruits? Mix in your leftover crushed Oreos for that delightful crunch!
Freezing
Pumpkin Patch Dirt Cups can be frozen but only the pudding layer! For best results, store it in an airtight container. When it’s time to eat, I recommend letting it thaw in the refrigerator overnight.
Reheating
You don’t typically reheat a dessert like this, but if you want to enjoy the pudding warm, a gentle microwave zap for a few seconds should do the trick! Stir it well after warming.
FAQs
Can I use other flavors of pudding?
Absolutely! Vanilla or butterscotch could work wonderfully in this recipe. Just adjust your toppings accordingly.
How long can I store leftovers?
Leftovers are best enjoyed within 2-3 days in the refrigerator, although you may need to refresh the whipped cream.
Is this recipe gluten-free?
It depends on the cookies! Check the packaging of your Oreos, or use a gluten-free chocolate cookie for a gluten-free dessert.
Can I use homemade whipped cream?
Yes! A homemade whipped cream gives an amazing lightness and flavor—just take care to keep it sweet and fluffy!
Final Thoughts
As you gather your loved ones, the kitchen bursts with laughter and that unmistakable warm aroma of homemade goodies. I hope these Pumpkin Patch Dirt Cups bring as much joy to your kitchen as they have brought to mine. Cooking is not just about the food; it’s about the moments shared, the laughs exchanged, and the memories made. Enjoy every delightful bite—happy cooking, dear friends!
With warmth and sweetness,
Chef Caroline
TasteItRecipes.com

Pumpkin Patch Dirt Cups
Ingredients
Main Ingredients
- 1 package chocolate pudding Make sure to use high-quality chocolate for an extra indulgent flavor.
- 1 package crushed Oreos Feel free to use any chocolate sandwich cookie!
- 1 cup whipped cream Homemade is a dream, but store-bought works as well.
- as needed gummy worms These playful additions bring whimsy to your dirt cups.
- as needed candy pumpkins Sweet and festive, they complement the chocolatey goodness.
- as needed plastic cups Using see-through cups allows everyone to admire the layers.
Instructions
Preparation
- Prepare the chocolate pudding according to package instructions.
- In each plastic cup, layer a generous dollop of chocolate pudding at the bottom.
- Sprinkle a layer of crushed Oreos on top of the pudding.
- Add a fluffy layer of whipped cream, repeating layers until cups are filled.
- Top each cup with gummy worms and candy pumpkins.
- Chill in the refrigerator for at least 30 minutes before serving.