
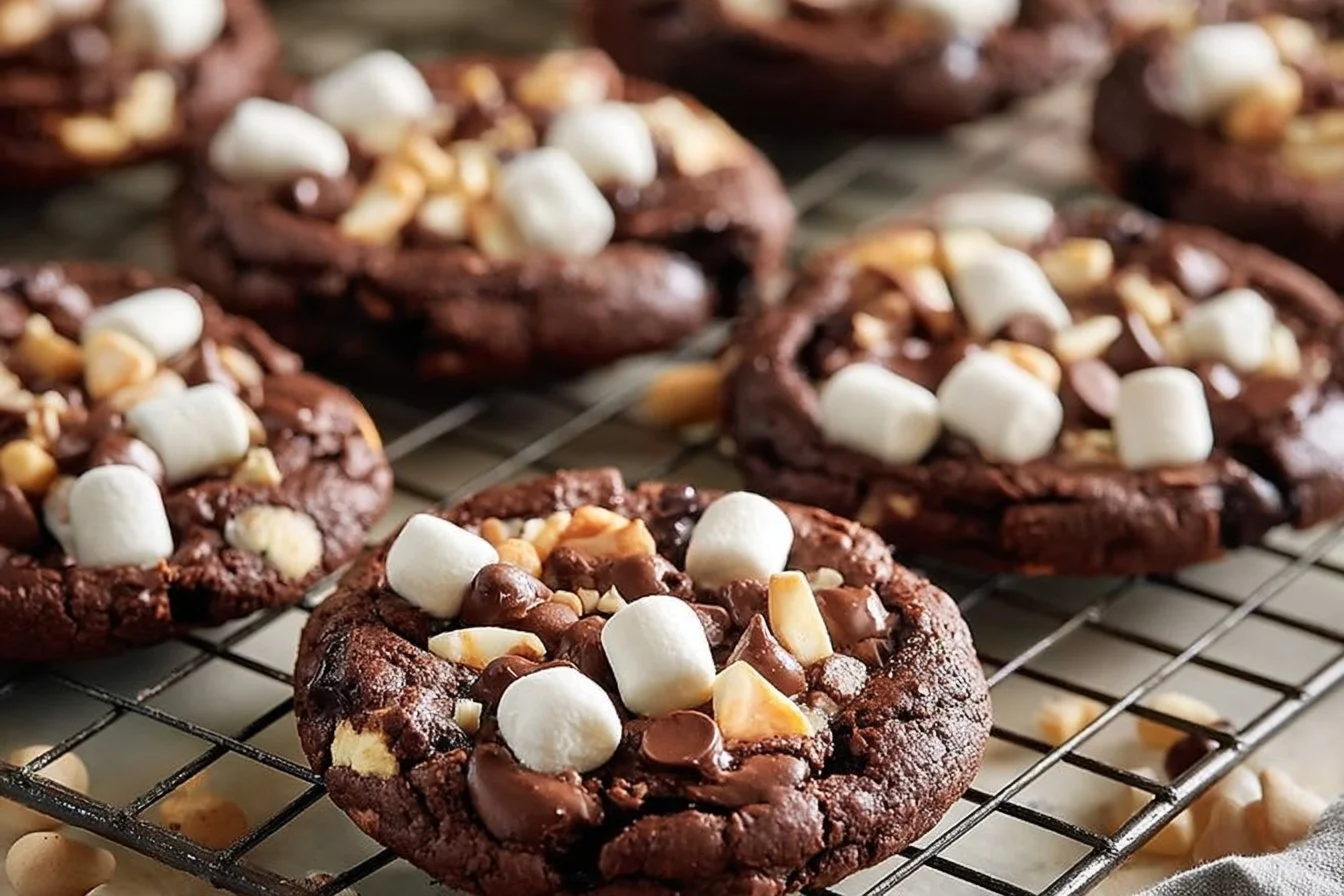
Ah, Gooey Rocky Road Cookies! Whenever I bake these delightful treats, they’re wrapped in sweet memories and cozy vibes. I discovered this recipe on a rainy afternoon while rummaging through a dusty old cookbook my grandmother had passed down to me. Each bite reminds me of her warm kitchen, the aroma of melting chocolate wafting through the air, and the playful sounds of raindrops tapping against the window.
As I let the dough come together, the scents mingled beautifully—the rich cocoa, the gentle sweetness of marshmallows, and the delightful crunch of nuts. Before I knew it, the batch was ready to bake, and the oven worked its magic. Once they emerged, golden edges cradling soft, gooey centers, I can still hear my family’s squeals of delight. Trust me, every moment spent with these cookies is a hug from the inside out, and I know you’ll love them just as much.
Why You’ll Love This Recipe
- Easy to Make: With simple ingredients and straightforward steps, you’ll have these cookies ready in no time!
- Quick Baking: Bakes in just 10–12 minutes, perfect for when you need a sweet fix in a hurry.
- Crowd-Pleasing: Soft, chewy, and packed with gooey marshmallows and rich chocolate—everyone will adore them.
- Customizable: Swap ingredients to fit your taste, or add unique flavors to make them your own.
- Perfect for Any Occasion: Whether it’s a family gathering or a cozy night in, these cookies are sure to steal the spotlight.
Ingredients
- 1 cup unsalted butter, softened: This is your foundation for a soft, rich cookie. Make sure to let it reach room temperature for easy creaming.
- 1 cup granulated sugar: Adds sweetness and helps create that lovely, tender texture. Don’t skimp—this is where flavor comes from!
- 1 cup brown sugar, packed: The molasses in brown sugar gives these cookies a deeper, more complex flavor.
- 2 large eggs: Ensure these are at room temperature for easy mixing and better incorporation.
- 1 teaspoon vanilla extract: Vanilla is the secret ingredient that enhances all the other flavors. Please don’t skip it!
- 2 cups all-purpose flour: Gives structure to our cookies. Always measure with a spoon and level for accuracy!
- 1 cup cocoa powder: This is what transforms our cookies into chocolaty bliss! Unsweetened is the way to go for the perfect balance.
- 1 teaspoon baking soda: This will help our cookies puff up just beautifully. Make sure it’s fresh!
- 1/2 teaspoon salt: Enhances the sweetness and balances the flavors. Even a small pinch makes a difference!
- 1 cup chocolate chips: Because more chocolate is always a good idea! Choose semi-sweet for a perfect sweet-tart combo.
- 1 cup mini marshmallows: These little gems add gooeyness that is simply irresistible.
- 1 cup chopped nuts (walnuts or pecans): Adds a delightful crunch and earthiness; feel free to toast them for extra flavor.
Full recipe card is below.
How to Make It
1. Preheat Your Oven
Start by preheating your oven to 350°F (175°C). This ensures even baking right from the start. Don’t forget to line your baking sheet with parchment paper to prevent any sticky situations!
2. Cream the Butter and Sugars
In a large bowl, cream together the softened butter, granulated sugar, and brown sugar until the mixture is light and fluffy. Take a moment to enjoy the sweet aroma wafting up; it’s like a hug in the air!
3. Add the Eggs and Vanilla
Beat in the eggs, one at a time, ensuring each is fully incorporated before adding the next. Stir in the vanilla extract; this will really elevate all those delightful flavors!
4. Mix Dry Ingredients
In another bowl, whisk together the flour, cocoa powder, baking soda, and salt. This step helps ensure there are no lumps, making the cookies ever so smooth!
5. Combine Wet and Dry Mixtures
Gradually add the dry ingredients to your wet mixture, mixing just until combined. We want to keep that dough soft and tender, so no overmixing here!
6. Fold in the Goodies
Gently fold in the chocolate chips, marshmallows, and nuts. Can you imagine how heavenly this dough will be? I promise, you’ll want to eat it by the spoonful!
7. Scoop and Bake
Drop spoonfuls of dough onto your prepared baking sheet, spacing them about 2 inches apart. Trust me, they will spread out beautifully!
8. The Magic Moment
Bake for 10-12 minutes or until the edges are set and the centers are still slightly soft. Ahhh, that smell—pure bliss!
9. Cool and Enjoy
Allow the cookies to cool on the baking sheet for a few minutes before transferring them to a wire rack. A little patience will reward you with perfectly chewy gooey cookies!
Pro Tips for Success
- Don’t overmix: For maximum chewiness, stop mixing as soon as everything is combined!
- Use room temperature ingredients: This allows your dough to blend together harmoniously.
- Taste before baking: Sneak a little taste of the dough for quality control. Just be sure to save some for the cookies!
- Follow cooling times: Letting cookies cool on the baking sheet for a bit ensures they set up nicely.
- Switch it up: Don’t hesitate to experiment with mix-ins; coconut, caramel bits, or even your favorite candy can give a whole new spin!
Flavor Variations
- Seasonal Twists: Add a sprinkle of cinnamon or pumpkin spice in the fall for a warm, cozy flavor.
- Nutty Options: Swap out the nuts for your favorite seeds or leave them out completely if you prefer a nut-free cookie.
- Chocoholic Delight: Use white chocolate chips or caramel-filled chocolate for an indulgent treat.
- Dried Fruits: Toss in some dried cherries or cranberries for an added tartness!
Serving Suggestions
Pair these cookies with a cold glass of milk, a hot cup of coffee, or a scoop of vanilla ice cream for the ultimate dessert experience. For a special touch, plate them on a rustic wooden board surrounded by fresh berries or a drizzle of chocolate sauce.
Make-Ahead & Storage
Feel free to make the dough ahead of time! Freeze the dough balls, and when you’re ready to bake, just pop them in the oven—no need to thaw. Store baked cookies in an airtight container at room temperature for up to 5 days. If they last that long!
Leftovers
If you’re lucky enough to have leftovers, chop them up and sprinkle over your favorite vanilla ice cream for a delicious sundae. Or, crumble them over yogurt for a sweet crunch!
Freezing
Absolutely! You can freeze the baked cookies for up to 3 months. Just wrap them tightly in plastic wrap and then place them in a freezer bag to prevent freezer burn.
Reheating
When you’re ready for a treat, the best way to reheat is in the oven at 350°F for about 5 minutes. You want that gooey texture back! If you’re in a hurry, the microwave will do—just heat in 10-second intervals until warm.
FAQs
Can I use margarine instead of butter?
Yes, but it may alter the flavor and texture slightly. Butter is best for that rich taste!
Are these cookies gluten-free?
You can substitute the all-purpose flour for a gluten-free flour blend. Just ensure it has a binding agent!
Can I skip the nuts?
Absolutely! Feel free to omit them according to your taste preference or dietary restrictions.
How can I make these cookies even more chocolatey?
You can replace some of the flour with additional cocoa powder or add chunks of your favorite chocolate bar.
Final Thoughts
Baking should be a joyful experience, filled with laughter, a sprinkle of chaos, and those little moments of delight like tearing into a warm, gooey Rocky Road Cookie. I hope these treats bring you as much happiness as they’ve brought my family and me. So grab your apron, let the chocolate fly, and let your kitchen be filled with warmth and love. Until next time, happy baking!
Your friend in the kitchen,
Chef Caroline
Gooey Rocky Road Cookies
Ingredients
For the Cookie Dough
- 1 cup unsalted butter, softened Make sure to let it reach room temperature for easy creaming.
- 1 cup granulated sugar Adds sweetness and helps create a tender texture.
- 1 cup brown sugar, packed Gives cookies a deeper, complex flavor.
- 2 large eggs Ensure these are at room temperature for better incorporation.
- 1 teaspoon vanilla extract Enhances all other flavors.
- 2 cups all-purpose flour Provides structure; measure with a spoon and level for accuracy.
- 1 cup cocoa powder Unsweetened cocoa transforms cookies into chocolaty bliss.
- 1 teaspoon baking soda Helps cookies puff up beautifully.
- 1/2 teaspoon salt Balances the flavors.
- 1 cup chocolate chips Choose semi-sweet for a perfect sweet-tart combo.
- 1 cup mini marshmallows Adds gooeyness that is simply irresistible.
- 1 cup chopped nuts (walnuts or pecans) Adds crunch; feel free to toast them for extra flavor.
Instructions
Preparation
- Preheat your oven to 350°F (175°C) and line your baking sheet with parchment paper.
- In a large bowl, cream together the softened butter, granulated sugar, and brown sugar until light and fluffy.
- Beat in the eggs, one at a time, ensuring each is fully incorporated before adding the next. Stir in vanilla extract.
- In another bowl, whisk together the flour, cocoa powder, baking soda, and salt.
- Gradually add the dry ingredients to the wet mixture, mixing just until combined.
- Gently fold in the chocolate chips, marshmallows, and nuts.
- Drop spoonfuls of dough onto the prepared baking sheet, spacing them about 2 inches apart.
Baking
- Bake for 10-12 minutes until the edges are set and the centers are still slightly soft.
- Allow cookies to cool on the baking sheet for a few minutes before transferring them to a wire rack.