
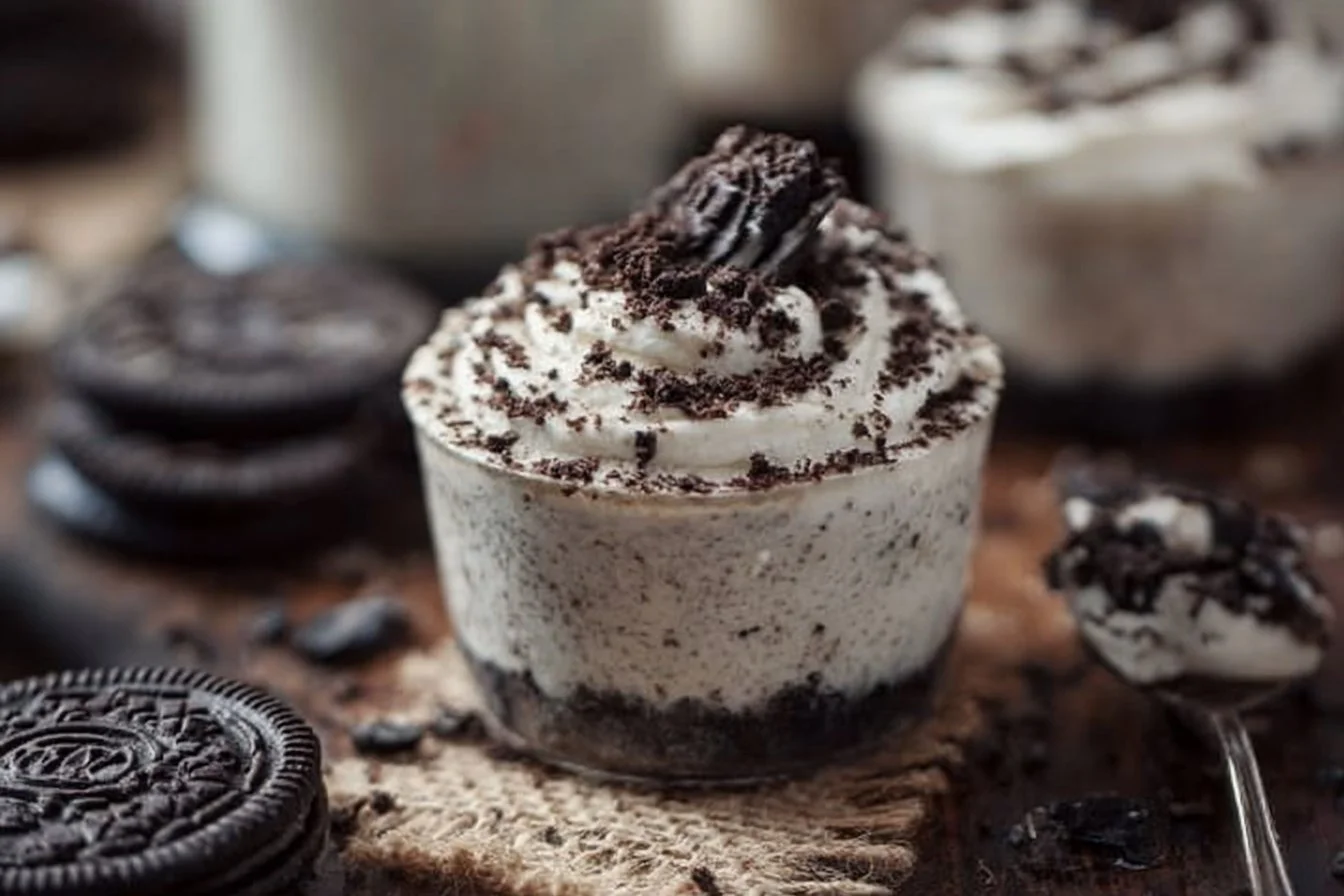
There’s something utterly delightful about the combination of creamy cheesecake and the iconic chocolatey crunch of Oreos. Imagine a dainty cup filled with a rich, no-bake cheesecake mixture that melts in your mouth, all while being surprisingly effortless to prepare. These Oreo No-Bake Cheesecake Cups come together quickly, yet they offer a decadent treat ideal for any occasion.
Whether you’re short on time or simply don’t want to turn on the oven, this dessert is a lifesaver. With minimal effort and maximum flavor, you’re set to impress family and friends without breaking a sweat. They are just as suitable for cozy nights in as they are for celebrations, making them a versatile addition to your dessert repertoire. Dive into this easy, no-bake recipe for Oreo No-Bake Cheesecake Cups, perfect for satisfying your sweet tooth.
Why Make This Recipe
You’ll find that these cheesecake cups check all the boxes for a delightful dessert. First, they deliver an incredible flavor profile that combines smooth cream cheese with the delightful crunch of Oreos. The balance of textures from the creamy cheesecake and crumbly Oreo base is simply irresistible.
These cups are also incredibly easy to make, taking only about 15 minutes of preparation. You don’t need to worry about baking them, which saves both time and effort. They can be made hours or even a day in advance, allowing you to focus on other dishes for your gathering.
Creating individual servings not only simplifies serving but also makes them portable—ideal for picnics or potlucks. You’ll find yourself reaching for this recipe time and again whenever you crave something sweet without the hassle.
How to Make Oreo No-Bake Cheesecake Cups
Ingredients
- 1 8 oz block of cream cheese, softened
- 1 8 oz Cool Whip or whipped topping
- 2/3 cup powdered sugar
- 1 tsp vanilla extract
- 24-26 Oreo cookies (more as desired)
Directions
Crush the Oreos: Place the Oreos in a plastic bag and seal it. With a rolling pin or a sturdy wooden spoon, crush the Oreos until you achieve a fine crumb texture. Spoon 1 1/2 to 2 tablespoons of the crushed Oreos into the bottom of 6 small dessert dishes, ensuring they hold at least 3/4 cup to 1 cup. Set this base aside.
Prepare the Cheesecake Mixture: In a large mixing bowl, use a hand or standing mixer to whip the softened cream cheese and powdered sugar together until the mixture is creamy and smooth. This should take about 3-5 minutes.
Add Flavorings: Once creamy, add in the vanilla extract and mix until incorporated.
Incorporate the Cool Whip: Gently fold the Cool Whip into the cream cheese mixture. Be careful not to deflate the whipped topping to keep the mixture light and airy.
Combine with Oreos: Fold in the remaining crushed Oreos until just mixed.
Assemble: Divide the cheesecake filling evenly among the dessert dishes, gently pressing it onto the layer of crushed Oreos at the bottom. Cover and chill the cups for about 1 hour or until you’re ready to serve.
Serve: Just before serving, top each cheesecake cup with a dollop of whipped cream and a sprinkle of crushed Oreos for an extra touch of deliciousness. Enjoy!
How to Serve Oreo No-Bake Cheesecake Cups
These Oreo No-Bake Cheesecake Cups are best served chilled. For an impressive presentation, layer them in clear glasses or dessert cups that showcase the contrasting layers of Oreo and cheesecake. Garnish with fresh whipped cream and additional crushed Oreos for a festive touch.
Pair these delightful cups with a rich cup of coffee or a refreshing glass of milk. If you’re hosting a gathering, these desserts add an elegant flair and are sure to be a hit among guests.
How to Store Oreo No-Bake Cheesecake Cups
To store any leftovers, keep them in an airtight container in the refrigerator for up to 3-4 days. If you wish to make these cups ahead of time, you can prepare them a day or two in advance without a hitch.
While freezing is not recommended due to potential texture changes in the Cool Whip, you can make the cheesecake filling in advance and store it in the refrigerator until you’re ready to assemble. If you do have leftovers that you want to freeze, you can try freezing the cheesecake mixture only for up to 2 months; thaw it in the refrigerator before serving, but note that the texture may not be the same.
Tips to Make Oreo No-Bake Cheesecake Cups
Use Room Temperature Cream Cheese: To achieve a smooth and creamy texture, ensure your cream cheese is at room temperature before mixing.
Flavor Variations: Consider adding melted chocolate chips or a spoonful of peanut butter into the cheesecake mixture for a unique twist.
Avoid Overmixing: When folding in the Cool Whip, be gentle to retain the fluffiness of the whipped topping.
Presentation Matters: Using stylish cups for serving not only makes the dessert visually appealing but also adds an elegant touch to any occasion.
Top It Off: Add fresh fruit, such as strawberries or raspberries, for a pop of color and added flavor.
Make Smaller Portions: If you want to manage portion sizes, use mini cups for smaller, bite-sized servings.
Graham Cracker Base: For an extra layer of flavor, consider mixing graham cracker crumbs with the Oreos for the base.
Try Different Cookie Bases: If you’re feeling adventurous, swap out the Oreos with another type of cookie, like vanilla wafers or chocolate chip cookies.
Add a Splash of Liqueur: A splash of coffee liqueur can add depth to the flavor profile without overpowering the dessert.
Garnishing Ideas: Add a drizzle of chocolate syrup over the top for an indulgent finish.
Variations
Vegan Delight
For a plant-based twist, substitute the cream cheese for vegan cream cheese and use coconut whipped cream in place of Cool Whip. This adaptation ensures that everyone at the table can indulge in the dessert.
Peanut Butter Oreos
Elevate the flavor by adding a layer of peanut butter between the cheesecake filling and Oreo base. Use crushed Oreos and mix in creamy peanut butter for a decadent twist.
Chocolate Lovers
Incorporate melted chocolate into the cheesecake mixture for a rich chocolatey experience. You can also swap Oreos for chocolate sandwich cookies for even more chocolatey goodness.
Gluten-Free Oreo Cups
Use gluten-free Oreos alongside gluten-free cream cheese and whipped topping to cater to those with gluten sensitivities while still enjoying the same great taste.
Citrus Freshness
To give your dessert a refreshing touch, add a splash of lemon or lime juice to the cheesecake mix. The tangy notes will balance perfectly with the sweetness of the Oreos.
FAQs
Can I make this ahead of time?
Absolutely! The cheesecake cups can be prepared in advance and stored in the refrigerator. Just allow them to chill for at least one hour before serving.
How do I store leftovers?
Store any leftover cheesecake cups in an airtight container in the refrigerator for 3-4 days.
Can I freeze this dish?
While it’s best enjoyed fresh, you can freeze the cheesecake filling without any Oreo base for up to 2 months. Thaw it in the refrigerator before serving.
What can I substitute for Cool Whip?
If you prefer homemade, you can whip up heavy cream with a touch of powdered sugar to create your own whipped topping.
How do I prevent the cheesecake from being too dense?
Ensure your cream cheese is at room temperature and fold in the Cool Whip gently to keep the mixture light and airy.
Is this dessert gluten-free?
Regular Oreos do contain gluten, but you can use gluten-free Oreos to create a gluten-free version of this dessert.
Can I double/halve this recipe?
Yes, you can easily adjust the quantities to suit your needs, just make sure to keep the ratio of ingredients consistent.
Indulge in these fantastic Oreo No-Bake Cheesecake Cups and watch your loved ones delight in every creamy, crunchy bite! Each cup is not just a dessert but a memory waiting to be made. Enjoy this rich, no-bake treat that’s sure to become a favorite in your home.