
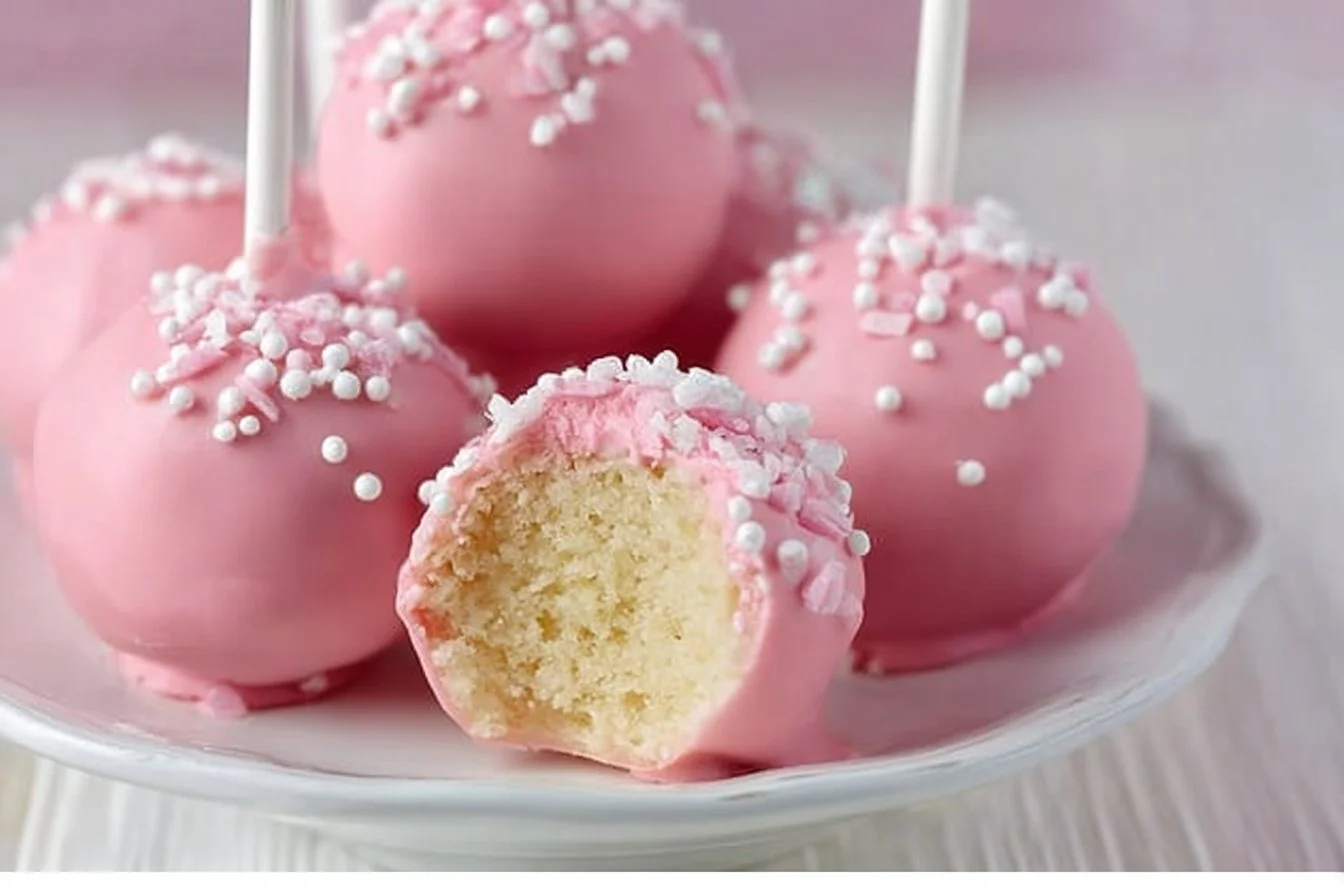
Ah, the glorious world of cake pops! This whimsical treat is bursting with cheer and has stolen my heart ever since I stumbled upon it during a chilly afternoon rendezvous at my local Starbucks. I remember the warmth of that cozy café, the aroma of freshly brewed coffee dancing in the air, and my excitement as I spotted those colorful, round delights behind the glass. One bite of that soft, sweet cake—encased in a silky coating and adorned with sprinkles—was pure bliss! And just like that, I was smitten. Making them at home not only lets me relive that lovely moment but also fills my kitchen with the joyful giggles of my family as we indulge in delightful bites of cake pop goodness.
Now, dear friends, I invite you to join me on this culinary adventure! Let’s turn your kitchen into a haven of sweetness that will have everyone falling in love with these charming little treats.
Why You’ll Love This Recipe
- Easy peasy: With just a few simple ingredients, you can whip these up in no time!
- Quick: Bake to ready-to-eat in under an hour—perfect for unexpected guests!
- Flavorful: The combination of vanilla cake and frosting makes for a rich, delightful treat.
- Crowd-pleaser: Whether it’s a party, festive gathering, or a simple snack, these pops are sure to charm everyone!
- Customizable: Get creative with flavors and decorations—there’s a whole world of cake pop possibilities!
Ingredients
- 1 box vanilla cake mix: This trusty base brings the classic flavor we all adore! It saves time and ensures a soft, fluffy cake.
- 1 cup frosting (vanilla flavor): Perfectly sweet and creamy, this will bind our cake and add delicious moisture. Always taste before mixing!
- 1 cup melted candy melts: These vibrant melts create that glossy coat and hold everything together beautifully. Choose your favorite color for a fun twist!
- Lollipop sticks: The traditional choice for cake pops, they make enjoying these treats even more delightful!
- Sprinkles (optional): Because who doesn’t love a pop of color? These add fun and flair to your creations!
Full recipe card is below.
How to Make It
1. Bake the Cake
Preheat that oven of yours to 350°F (175°C) and pour the vanilla cake mix into a bowl with the ingredients specified on the box. Mix until everything is well combined and velvety. When it’s baking, you’ll get to enjoy that delightful aroma wafting through your kitchen. Let it cool completely once it’s out of the oven—your patience will be rewarded!
2. Crumble the Cake
Once cooled, let’s get our hands a little messy! Crumble the cake in a large bowl until it resembles fine crumbs. This is where the fun begins—there’s something undeniably satisfying about the texture of freshly baked cake in your hands.
3. Add the Frosting
Now, add in that cup of creamy frosting. Dive right in and mix it all together. Whether you use your hands or a spatula, continue blending until the cake and frosting are a cohesive, delightful mixture.
4. Form Cake Balls
Take small portions of the cake mixture and roll them into bite-sized balls. Place these on a baking sheet lined with parchment paper. Don’t worry if they aren’t perfect—each little pop will have its unique charm!
5. Freeze the Cake Balls
Pop the baking sheet into the freezer for about 15 minutes. This will help the cake balls hold their shape when we dip them in the melts. The anticipation is half the fun!
6. Prepare the Lollipop Sticks
While those balls are chilling, melt your candy melts according to the package instructions. Take one lollipop stick, dip the tip in the melted candy, and then gently insert it into the center of each cake ball. This creates a beautiful bond!
7. Coat the Cake Pops
Now the magical moment arrives! Dip each cake pop into the melted candy, swirling gently to ensure an even coat. You want them to be glossy and enticing. Keep a plate nearby for any drips!
8. Let Them Set
If you’re feeling fancy, sprinkle some colorful sprinkles on top while the coating is still wet! Now it’s time to let those pops stand upright in a styrofoam block or similar stand, allowing them to set completely. The joy of watching those colors come together is simply marvelous!
Pro Tips for Success
- Ensure your cake is completely cool before crumbling to avoid a sticky mess!
- Mix well to ensure all flavors are balanced and evenly distributed.
- Remember, practice makes perfect! Don’t worry about making them look flawless—each cake pop has its own personality.
Flavor Variations
- Chocolate Cake Pops: Just swap out the vanilla cake mix for chocolate!
- Peppermint Twist: Add crushed peppermint candies to the chocolate melts during winter.
- Seasonal Fruit: Incorporate strawberries or lemon zest into the frosting for a refreshing twist!
Serving Suggestions
Decorate your cake pops on a festive platter to share with loved ones or set them on a countertop stand for party guests to admire and graze. Pair with an aromatic cup of coffee or a glass of cold milk, and watch everyone’s eyes light up!
Make-Ahead & Storage
You can prep your cake pops a day in advance! Store them in an airtight container in the fridge, where they’ll stay fresh for about 5 days. Just make sure to keep them away from any strong odors so they maintain that sweet aroma!
Leftovers
With leftovers, why not get creative? Crumble them into a delicious parfait with yogurt and fresh fruit for breakfast or blend them into a milkshake for a decadent treat!
Freezing
Absolutely! Once you’ve coated your pops, wrap them individually in plastic wrap and store them in a freezer-safe bag. They can last for about a month. Thaw in the fridge overnight, and enjoy as if they were fresh!
Reheating
Cake pops are best enjoyed at room temperature. If you find yourself needing to warm them slightly, a quick stay in the microwave for 10 seconds should do the trick—just don’t overdo it!
FAQs
Can I use other flavors of cake mix?
Absolutely! Chocolate, red velvet, or even lemon cake mixes can make fantastic pops, allowing for endless flavor exploration!
How do I keep my cake pops from falling off the sticks?
The key is to freeze them before dipping and to ensure you dip the sticks in the melted candy first. This helps create a strong bond.
Can I use homemade cake and frosting instead of boxed?
Of course! Just make sure it has the right texture to form balls without being overly moist.
What are some decoration ideas besides sprinkles?
Chopped nuts, drizzles of chocolate, or colored edible glitter can add a lovely touch! Get creative and use your favorite toppings!
Final Thoughts
There you have it, my dear kitchen adventurers! Making your own Starbucks-style cake pops at home is not just a baking task, but a joyful experience filled with love, laughter, and possibly a bit of kitchen chaos. Embrace the magic of flavors and colors, and let these sweet bites bring a sense of warmth to your home. So roll up those sleeves, and let your creativity flow! As always, happy baking, and may your days be sprinkled with joy and sweetness.
With love,
Chef Caroline

Starbucks Cake Pop
Ingredients
For the Cake
- 1 box vanilla cake mix A classic flavor base for soft and fluffy cake.
For the Filling
- 1 cup frosting (vanilla flavor) To bind the cake and add moisture.
For Coating
- 1 cup melted candy melts Choose vibrant colors for a fun twist!
- as needed lollipop sticks Traditional sticks for serving cake pops.
- as needed sprinkles (optional) For decoration and added flair.
Instructions
Baking
- Preheat the oven to 350°F (175°C) and mix the vanilla cake mix with the ingredients specified on the box.
- Bake according to package instructions, then let the cake cool completely.
Crumbling & Mixing
- Crumble the cooled cake into fine crumbs in a large bowl.
- Mix in the cup of frosting until fully combined and cohesive.
Forming Cake Pops
- Roll small portions of the mixture into bite-sized balls and place on a parchment-lined baking sheet.
- Freeze the cake balls for about 15 minutes.
Dipping
- Melt the candy according to package instructions and dip the tip of each lollipop stick into the melted candy.
- Insert the stick into the center of each cake ball.
- Dip each cake pop into the melted candy, ensuring an even coat, and sprinkle additional toppings if desired.
Setting
- Stand the cake pops in a styrofoam block to set completely.